=

desalasworks presents:

a selection of works by steven de salas

Startup Unicorns

Warning: Use of undefined constant archives - assumed 'archives' (this will throw an Error in a future version of PHP) in /home/desagquj/public_html/wp-content/themes/desalasworks.v1.6/archive.php on line 36

Warning: Use of undefined constant page - assumed 'page' (this will throw an Error in a future version of PHP) in /home/desagquj/public_html/wp-content/themes/desalasworks.v1.6/archive.php on line 36

Warning: A non-numeric value encountered in /home/desagquj/public_html/wp-content/themes/desalasworks.v1.6/archive.php on line 36

Warning: A non-numeric value encountered in /home/desagquj/public_html/wp-content/themes/desalasworks.v1.6/archive.php on line 36
class="post-2357 post type-post status-publish format-standard has-post-thumbnail hentry category-games category-print">

Kickstarter campaign. 2-6 player competitive card game for people of all ages.

What is Startup Unicorns?

START-UP UNICORNS is a competitive 2-6 player CARD GAME aimed at players OF ALL AGES that aims to recreate the EXCITEMENT of turning an awesome idea into a successful startup.

You will be competing with your friends to FIND INVESTORS, BUILD A TEAM, and SABOTAGE EACH OTHER to be the first person turn their startup into a MILLION DOLLAR business!

Each game one takes around 20-30 MINUTES depending on the number of players. They are FAST and FUN. You’ll be wanting to COME BACK FOR MORE!

Package Contents

The basic game comes as a SET OF 108 CARDS and INSTRUCTIONS 

  • 1 x Set of INSTRUCTIONS (English & Spanish)
  • 12 x “COMPANY” cards
  • 24 x “TECH” cards
  • 16 x “MARKETING” cards
  • 16 x “PRODUCT” cards
  • 12 x “INVESTOR” cards
  • 10 x “ADVANTAGE” cards
  • 10 x “SABOTAGE” cards
  • 6 x “QUICK GUIDE” cards

Gallery


LetMePark

Warning: Use of undefined constant archives - assumed 'archives' (this will throw an Error in a future version of PHP) in /home/desagquj/public_html/wp-content/themes/desalasworks.v1.6/archive.php on line 36

Warning: Use of undefined constant page - assumed 'page' (this will throw an Error in a future version of PHP) in /home/desagquj/public_html/wp-content/themes/desalasworks.v1.6/archive.php on line 36

Warning: A non-numeric value encountered in /home/desagquj/public_html/wp-content/themes/desalasworks.v1.6/archive.php on line 36

Warning: A non-numeric value encountered in /home/desagquj/public_html/wp-content/themes/desalasworks.v1.6/archive.php on line 36
class="post-2271 post type-post status-publish format-standard hentry category-cloud category-microservices category-mobile category-voice tag-api tag-aws tag-docker tag-google-cloud tag-javascript tag-microservices tag-mongodb tag-node-js tag-payment-processing tag-voice-assistants tag-vue-js">

Building smart cities by connecting vehicles with their environment.

Pivotal Role

Steven had a pivotal role designing and building the core platform infrastructure for this startup in the urban mobility space. Maximizing IT resource use and speed-to-market with low-cost, stable, high-performance infrastructure.

Backend Architecture & Integration

Integration with multiple third-party parking provider services, allowing real-time price and availability checks, bookings and automated parking notifications.

The skills used were: Google Cloud, Amazon Web Services, Build Automation, JavaScript, Node.js, API Development, MongoDB, DevOps, Docker, ECS, Gitlab, Security/Cryptography, Bash/Unix scripting, MQTT, Nginx, PCI Payment Processing (Paycomet TPV) and Test Automation.

Web & Mobile Hybrid App

Development and enhancements to a Vue.js (Nuxt) web app doubling up as a hybrid web-view app for iOS and Android platforms, allowing clients to carry their parking experience anywhere inside their pocket.

Voice Assistant Integration

Steven worked on integrating the Alexa Skill that allows users to search and book whilst driving their car.

This included providing all necessary backend APIs and authentication/user flows as well as the technology platform capable of live multi-provider search and bookings, including live monitoring.

Payment Processing

Steven also integrated the customer Credit Card capture and payment processing flows for both bookings and automated parkings.

Asynchronous Neural Networks in JavaScript

Warning: Use of undefined constant archives - assumed 'archives' (this will throw an Error in a future version of PHP) in /home/desagquj/public_html/wp-content/themes/desalasworks.v1.6/archive.php on line 36

Warning: Use of undefined constant page - assumed 'page' (this will throw an Error in a future version of PHP) in /home/desagquj/public_html/wp-content/themes/desalasworks.v1.6/archive.php on line 36

Warning: A non-numeric value encountered in /home/desagquj/public_html/wp-content/themes/desalasworks.v1.6/archive.php on line 36

Warning: A non-numeric value encountered in /home/desagquj/public_html/wp-content/themes/desalasworks.v1.6/archive.php on line 36
class="post-1865 dw-article type-dw-article status-publish hentry category-code category-iot tag-javascript tag-machine-learning tag-robotics">

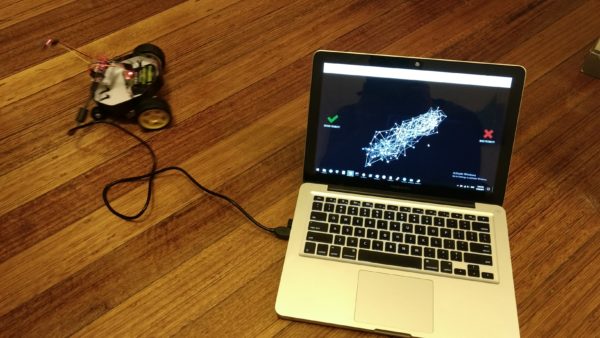
For the past few months I’ve been trying to get some of my robots to roam around the house with a mind of their own, learning as they go. It turns out that the task is harder than I thought.

The main issue is paralell signal processing.

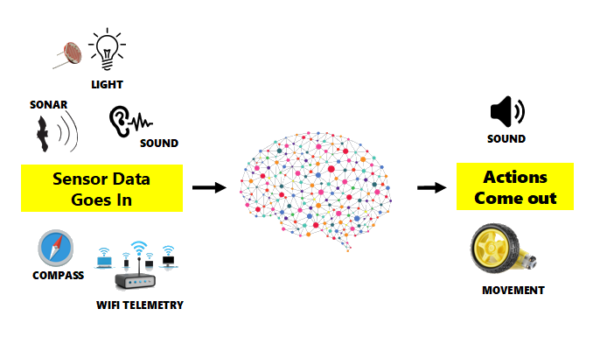
To illustrate: a single robot will have usually 3-5 sensors that collect information on the world around it. I’m particularly interested in ambient light as i want it to be able to recharge its batteries with a mini solar panel if it needs to, but i also have some useful options for collision detection, orientation and WiFi triangulation.

First attempt, enter the matrix

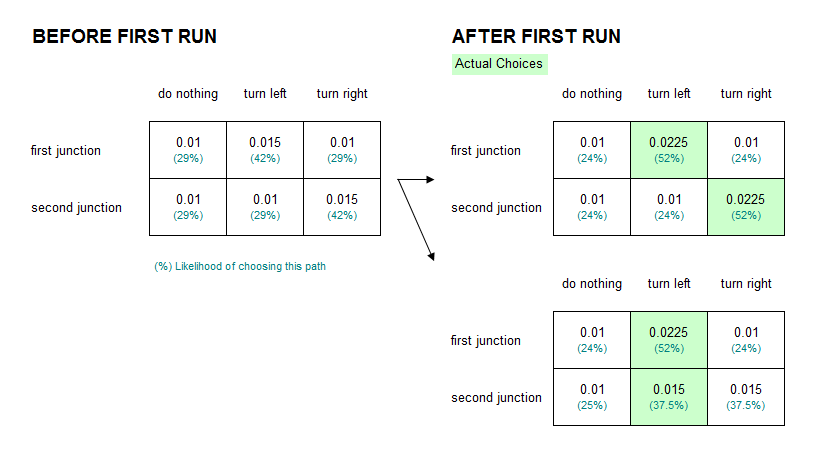
I originally attempted a weighted relational matrix of inputs to outputs. Like a chequers board where each square starts off with one piece that represents the strength of the relationship between an input and an output. To simulate learning, I would stack extra pieces on a square, for example to reinforce past choices, making it more likely to get picked in subsequent iterations. I called the engine fusspot, which I thought was a suitable name given that this algorithm could be trained but in the end, choices were always fuzzy and random.

chequers

This worked, in a fashion. I could train the engine by modifying the strength of each relationship, making subsequent choices more likely to be biased by training, but it was a terrible solution when trying to implement it in practice.

The main problem is that this solution does not take context into account, and it turns out context is everything – you can’t rely on a single input channel (such as IR sensor) to determine the choices a robot can make (stop, turn, keep going), it takes a wholistic approach that integrates data from all the sensors at the same time.

Context is everything. You can’t rely on a single input channel, it takes a wholistic approach that integrates data from all the sensors at the same time.

I got to a point where trying to break down the problem further wasn’t getting me anywhere. So I decided to look around and see what other people had done.

Video games and artificial gardening.

By this point I had done a bit of reading on Artificial Neural Networks and decided that this was roughly where I was heading.

This led me into the world of video games. I’ve played plenty of games myself and know that game developers are at the leading edge of AI.

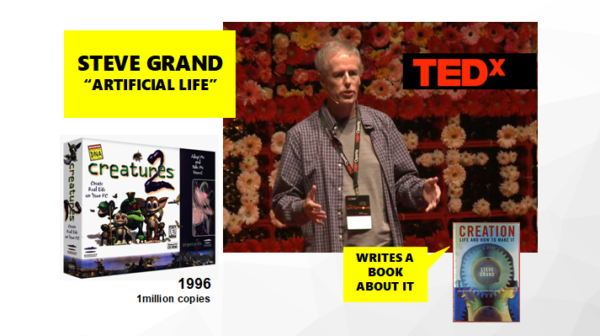
The wikipedia article inspired me to look a bit more into a game called Creatures written by a guy called Steve Grand. Steve dropped off the face of the earth a few years ago through a self-inflicted kickstarter project gone wrong.

But before he did so, he wrote an excellent book called Creation, Life and how to make it, where he details some of the techniques he used, as well a zen-like philosophical outlook on artificial life powerful enough to blow my socks off and turn upside down all my notions of what AI is and should be about:

All life, both biological and artificial, are series of emergent patterns that persist longer than others, in other words, certain patterns of interaction between components (cells usually, though these are also made of patterns of interaction between cellular components and so on to the atomic level) happen to be more successful in their environment and thus persist through time.

The beauty here is that life is a set of emergent patterns, rather than the components of which its made of, or the behaviour that arises from their interaction. The best humans can strive for is creating the conditions that would allow such patterns to emerge, for example by defining the underlying components and encouraging certain patterns of behaviour over others. Think of it as artificial gardening..

The beauty here is that life is a set of emergent patterns, rather than the components of which its made of, or the behaviour that arises from their interaction.

Neural Networks, Rebooted.

So. I started modelling a neural network in JavaScript.

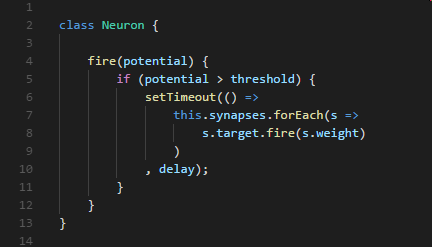
Its not hard. Just an array of nodes, each containing another array of links to other nodes. With the added catch that each link to another node has a weight between 0 and 1, which determines if the onward connection should be fired during a chain-reaction event. My first commit was 100 lines long. 60 if you remove comments and whitespacing.

Since I was trying to accurately model the biological system in our own brains (rather than a mathematical abstraction), I noticed my own gut telling me to add a slight delay between firing neurons. It seems natural really, it generally takes a whole millisecond to fire off the next neuron inside our brains, so the signal is never going to travel all the way across the brain instantly.

This solved my problem rather neatly. I had several input streams from each sensor that needed to be integrated, and I needed something that could be trained on a particular input, while taking into account all the other inputs, or even a changing set of inputs. Something that could behave more like a normal brain and create an intricately timed set of reactions to an input (think of the muscles involved in picking up your phone), or integrate an input with itself (by having a signal that loops around).

I noticed my own gut telling me to add a slight delay between firing neurons. It seems natural really … the signal its never going to travel all the way across the brain instantly.

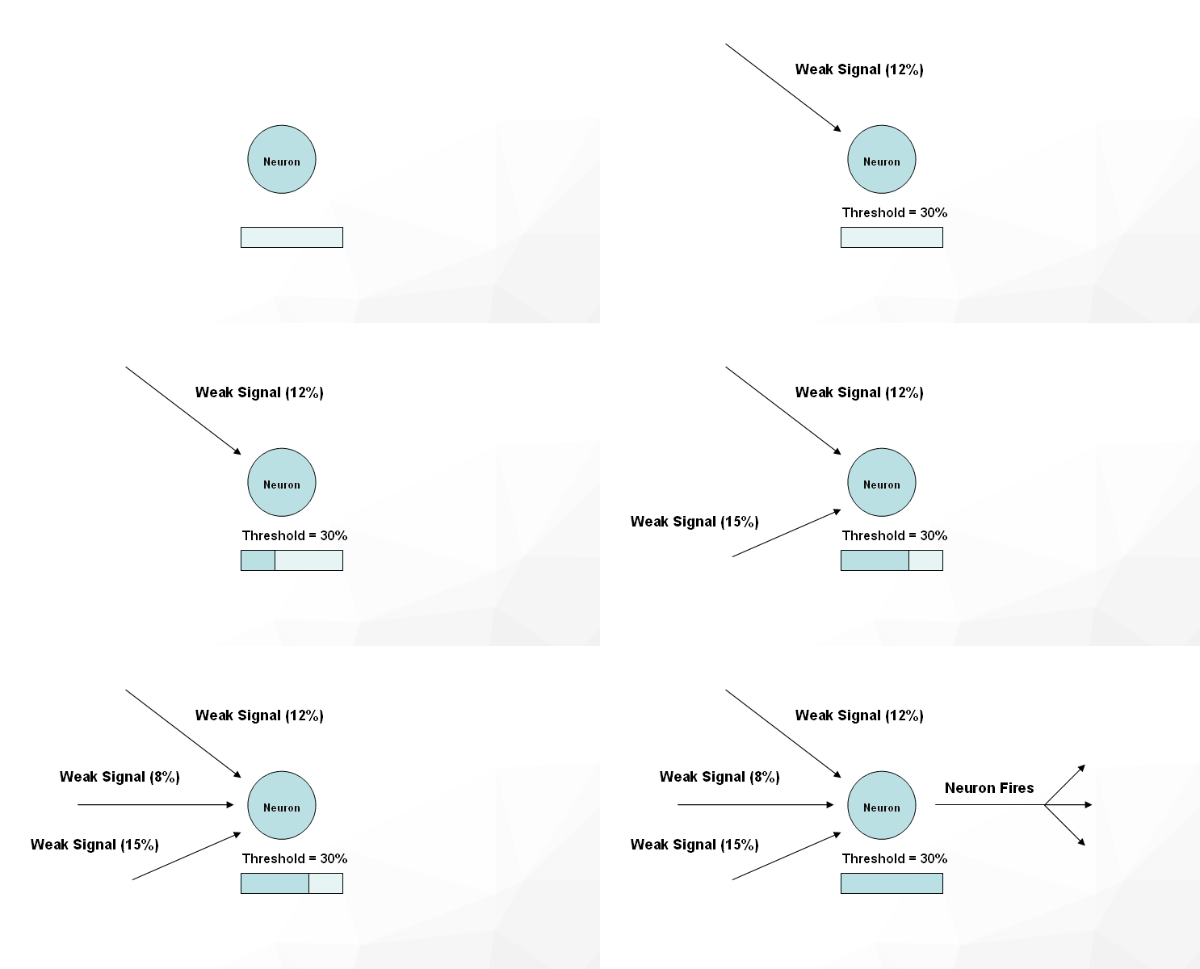
I also researched the interleaving of signal patterns in real neurons and came up with a spiking model that combined multiple upstream signals before firing a signal downstream.

Chaos and the game of life

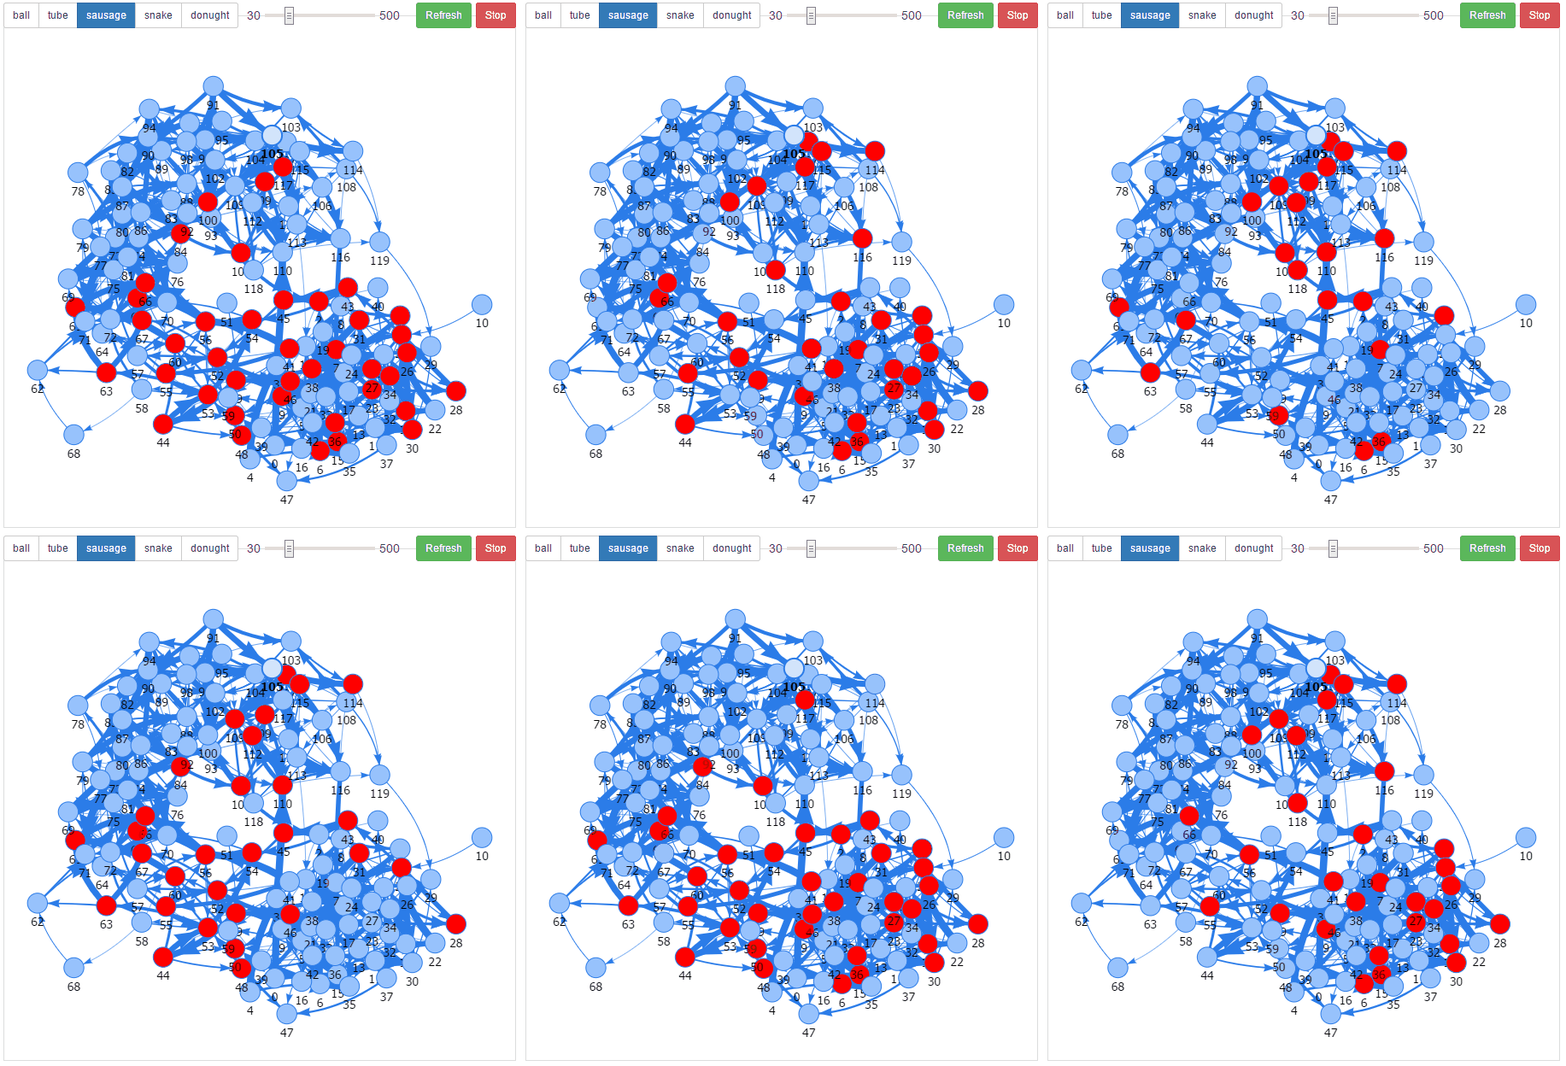
This was all confusing as hell so I needed to visualize my network in order to understand what it was doing.

Thankfully JavaScript is a great language for that, there are tons of libraries out there for visualization and thanks to V8 and the NodeJS ecosystem you can run the same code on the browser as you would a command line executable. I used browserify to require my modules on a browser page and viz.js to perform visualizations using HTML5 <canvas/>.

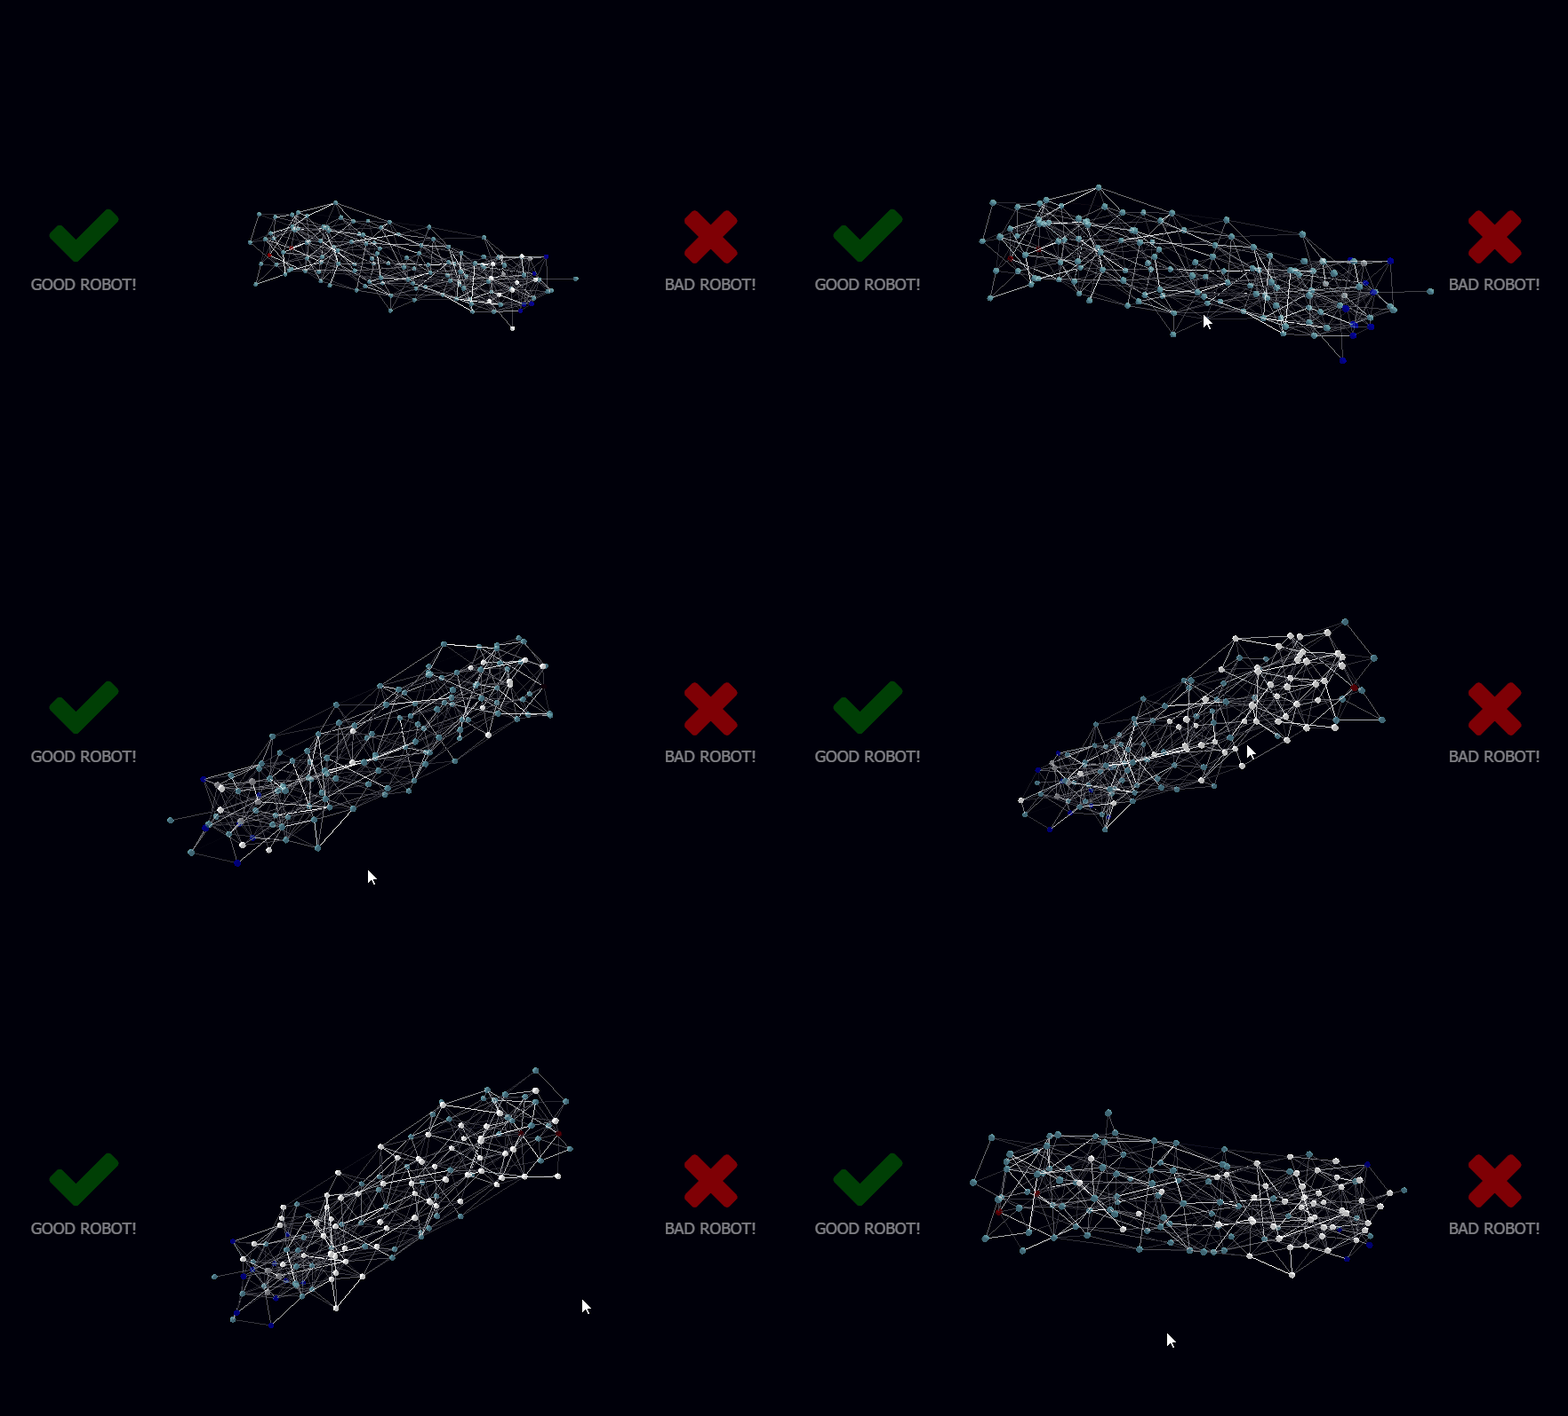
The result was intriguing. I noticed all sorts of patterns, travelling waves, and oscillations taking place when a neuron was fired. It was utter chaos but it was also mesmerizing.

The result was intriguing. It was utter chaos, but it was also mesmerizing.

I felt I was on to something. After all electrical wave patterns are an inherent part of the human brain. So why do prevailing models of neural networks ignore them?

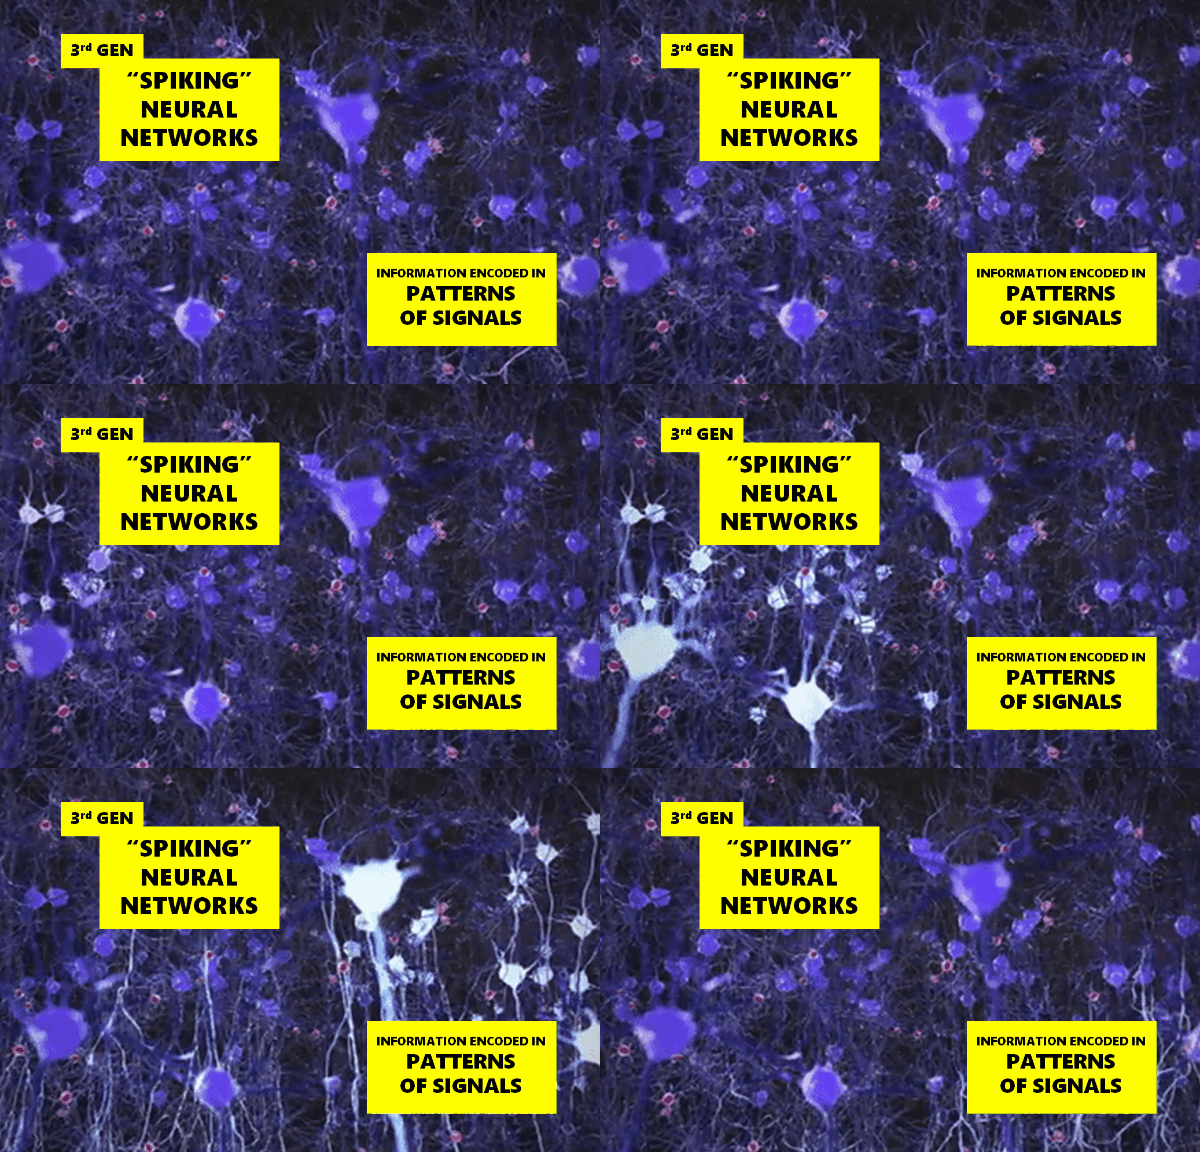
It turns out that I was building something called a Spiking Neural Network, the so-called 3rd generation of neural networks that more closely emulate their biological cousins, and which encode information in patterns of signals.

I tried different network shapes, a ball, a sausage and a dounught. All produced interesting variations. Jonathan, a colleague at work, said it reminded him of Conway’s Game of Life. I had to agree with him.

Now in 3D

It took some extra modelling to come up with a good visualization that would let me understand what was going on, my original 2D library could only visualize around 300 neurons before falling over, using 3D I could increase that to a few thousands.

I called the newly born library botbrains, and used a combination of a 3D Force Graph in WebGL for rendering the network, WebSockets for client/server interaction, and node.js for running the neural network on the back-end so it could integrate via USB Serial to the Arduino microcontroller running my motors and collecting data from sensors.

Machine Learning, for signal patterns.

Next challenge came from learning. I had to find a way to make the robot marginally smarter over time. After all its not very useful if your robot keeps bumping into the wall.

Thankfully, plenty of people had already worked out the answer. Or rather two answers, really. You either use reinforcement or back-propagation. Both good approaches, but since my network was asynchronous, working out the loss-function for back-propagation was a real headache (I had to backtrack in time taking into account competing signals) and besides I didn’t want to depend on layers as I wanted all the richness of signal patterns that different shapes of neural network could create.

The biological answer here was reinforcement, aka “Long Term Potentiation“. So I went with that. Later I found out that AlphaZero, the current AI chess champion used reinforcement too so that made me feel much better about my choice.

So, how to implement reinforcement learning?

Well, its not so hard really, though it took several iterations. The basic premise was to reinforce synapses that fired recently whenever the robot does something good (like avoid an obstacle), and to weaken synapses that fired recently whenever something bad happens.

Although pretty close, this wasn’t enough on its own, as the network would either overload or fail to connect altogether, so after a fair bit of testing I worked out that the most elegant model was to maintain the network weight constant by spreading out any positive or negative changes over the remaining unused synapses, so effectively during learning I would strengthen ‘successful’ connections while weakening all the other ones, reversing the process for negative reinforcement.

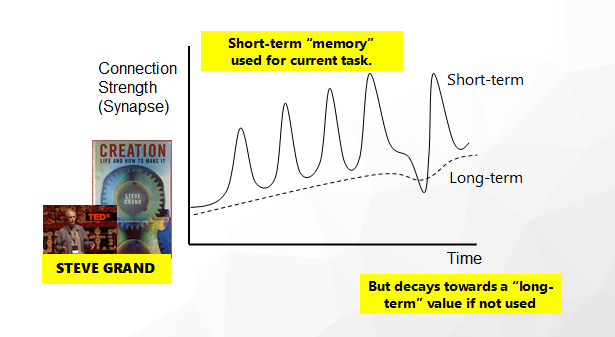
I also added a tendency for synapse weights to decay towards their starting weight with each learning iteration, as well as strengthening unused synapses randomly whenever negative reinforcement is applied (ie, sometimes the solution to the problem can be found by using neural pathways that have never been used before).

Long-term memory was a problem, and still is to this day though its getting better.

I added the ability for synapses to contain both ‘short-term’ and ‘long-term’ weights, both of which are influenced by the other.  I pinched this idea from Steve Grand, which I found an incredibly simple and powerful solution to long-term memory.

Now all I had to do was to plug my robot into it.


DarklyLabs LaserWeb

Warning: Use of undefined constant archives - assumed 'archives' (this will throw an Error in a future version of PHP) in /home/desagquj/public_html/wp-content/themes/desalasworks.v1.6/archive.php on line 36

Warning: Use of undefined constant page - assumed 'page' (this will throw an Error in a future version of PHP) in /home/desagquj/public_html/wp-content/themes/desalasworks.v1.6/archive.php on line 36

Warning: A non-numeric value encountered in /home/desagquj/public_html/wp-content/themes/desalasworks.v1.6/archive.php on line 36

Warning: A non-numeric value encountered in /home/desagquj/public_html/wp-content/themes/desalasworks.v1.6/archive.php on line 36
class="post-2120 post type-post status-publish format-standard has-post-thumbnail hentry category-desktop-application category-iot category-ui tag-electron tag-javascript tag-react tag-redux tag-webgl tag-websockets">

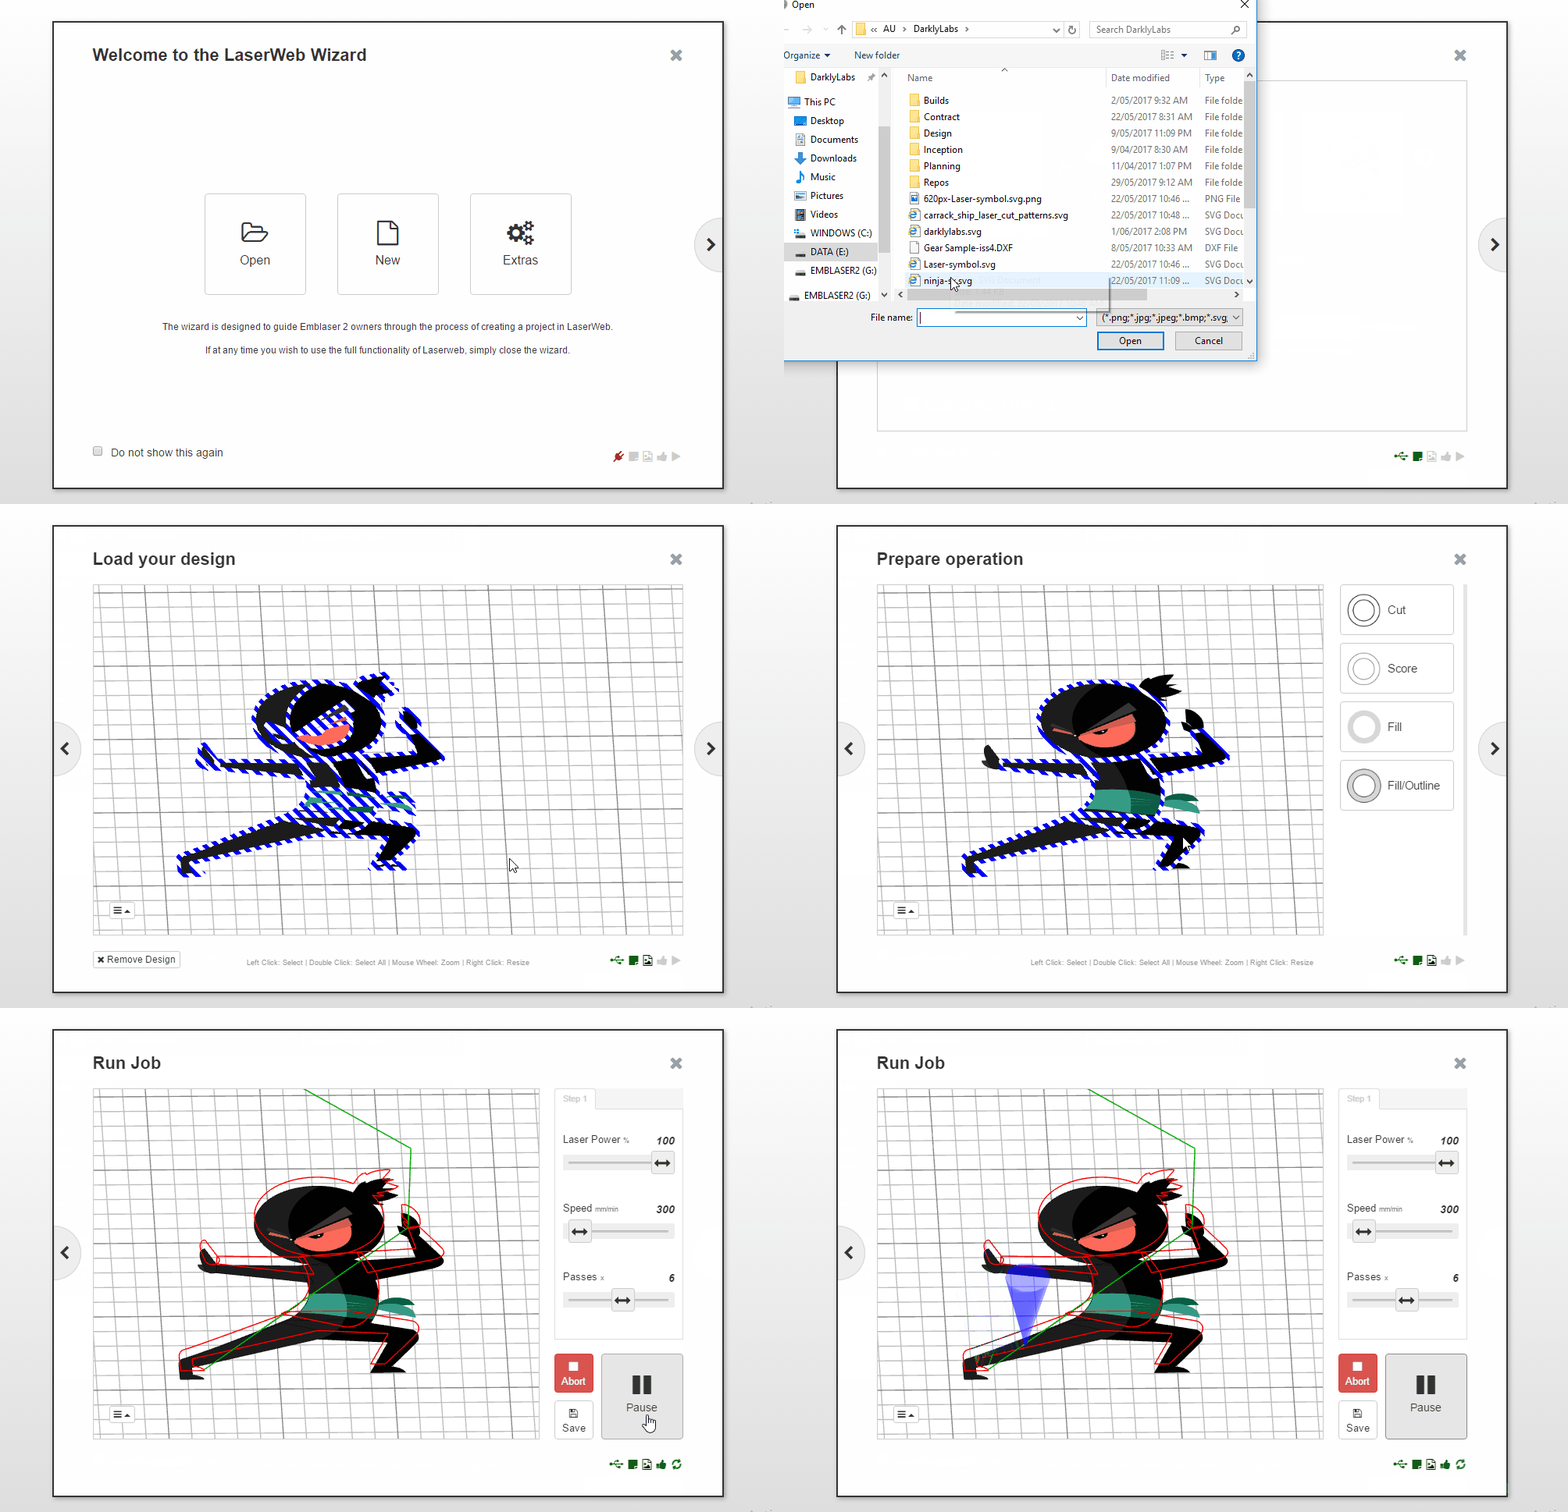
Steven was a one-man team building on top of open source “LaserWeb” software, automating and simplifying complex user flows to bring laser cutting to the beginner user.

This project involved full SDLC, building a simple and easy-to-use JavaScript wizard interface for the Emblaser2 laser cutter & engraver, which went from design to delivery in 6 weeks.

A challenging and very enjoyable project using NodeJS, JavaScript (ES6), Electron (Win/OSX Desktop app), Embedded, Computer Numerical Control (CNC/GCODE), WebWorkers, USB serialport, Github, CI / build automation (Travis, Appveyor), CSS, DOM Events, Webpack, React, Redux, Socket IO, WebGL 3D.


SEEK Role Requirements

Warning: Use of undefined constant archives - assumed 'archives' (this will throw an Error in a future version of PHP) in /home/desagquj/public_html/wp-content/themes/desalasworks.v1.6/archive.php on line 36

Warning: Use of undefined constant page - assumed 'page' (this will throw an Error in a future version of PHP) in /home/desagquj/public_html/wp-content/themes/desalasworks.v1.6/archive.php on line 36

Warning: A non-numeric value encountered in /home/desagquj/public_html/wp-content/themes/desalasworks.v1.6/archive.php on line 36

Warning: A non-numeric value encountered in /home/desagquj/public_html/wp-content/themes/desalasworks.v1.6/archive.php on line 36
class="post-2219 post type-post status-publish format-standard hentry category-cloud category-microservices category-web-applications tag-angular-js tag-aws tag-c tag-javascript tag-microservices tag-node-js tag-nosql">

Full Stack JavaScript contract role working on SEEK User Interfaces and AWS hosted API’s.

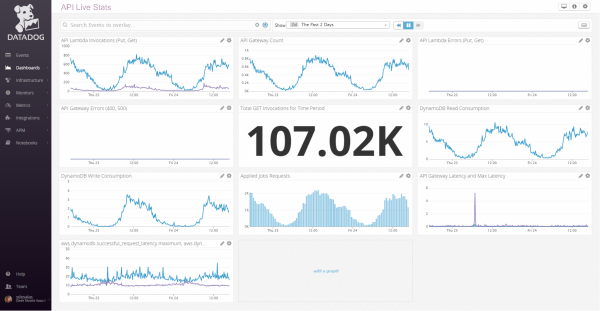
Steven joined the ‘Role Requirements’ team to help deliver great candidate matching. Millions of job applications are now getting scored and ranked for role suitability every year, resulting in significant time savings to users of the SEEK platform.

The majority of the work involved various enhancements to the back-end capability in the form of AWS-hosted micro-service APIs, and some user interface updates to accommodate improvements to job-seeker and hirer experiences.

Working in a Continuosly Deployed, Agile environment with Node.Js, Angular, Knockout, Jasmine, Karma, Gulp, TeamCity, LESS, Microservices / APIs, PACT, Swagger, Golang, DynamoDB, C#, SQL Server, Docker, Serverless, SNS/SQS, Lambdas, AWS DevOps.

Immutability in JavaScript, A Contrarian View

Warning: Use of undefined constant archives - assumed 'archives' (this will throw an Error in a future version of PHP) in /home/desagquj/public_html/wp-content/themes/desalasworks.v1.6/archive.php on line 36

Warning: Use of undefined constant page - assumed 'page' (this will throw an Error in a future version of PHP) in /home/desagquj/public_html/wp-content/themes/desalasworks.v1.6/archive.php on line 36

Warning: A non-numeric value encountered in /home/desagquj/public_html/wp-content/themes/desalasworks.v1.6/archive.php on line 36

Warning: A non-numeric value encountered in /home/desagquj/public_html/wp-content/themes/desalasworks.v1.6/archive.php on line 36
class="post-1929 dw-article type-dw-article status-publish hentry category-code category-ui tag-javascript tag-react tag-redux">

TL/DR: Immutability is more a fashion trend than a necessity in JavaScript. If you are using React it does provide a neat work-around to some confusing design choices in state management. However in most other situations it wont add enough value over the complexity it introduces, serving more to pad up a resume than to fulfill an actual client need.

I wrote this originally as a answer to a stack overflow question posted by someone who was as baffled by this JavaScript programming trend as I was.

Here is my answer to this topic, it is contrarian and may also be contentious, but bear in mind its not the only answer, its just my own point of view.

Why is immutability so important(or needed) in javascript?

Well, I’m glad you asked!

Some time ago a very talented guy called Dan Abramov wrote a javascript state management library called Redux which uses pure functions and immutability. He also made some really cool videos that made the idea really easy to understand (and sell).

The timing was perfect. The novelty of Angular was fading, and JavaScript world was ready to fixate on the latest thing that had the right degree of cool, and this library was not only innovative but slotted in perfectly with React which was being peddled by another Silicon Valley powerhouse.

Sad as it may be, fashions rule in the world of JavaScript. Now Abramov is being hailed as a demigod and all us mere mortals have to subject ourselves to the Dao of Immutability… Wether it makes sense or not.

What is wrong in mutating objects?

Nothing!

In fact programmers have been mutating objects for er… as long as there has been objects to mutate. 50+ years of application development in other words.

And why complicate things? When you have object cat and it dies, do you really need a second cat to track the change? Most people would just say cat.isDead = true and be done with it.

Doesn’t (mutating objects) make things simple?

YES! .. Of course it does!

Specially in JavaScript, which in practice is most useful used for rendering a view of some state that is maintained elsewhere (like in a database).

What if I have a new News object that has to be updated? … How do I achieve in this case? Delete the store & recreate it? Isn’t adding an object to the array a less expensive operation?

Well, you can go the traditional approach and update the News object, so your in-memory representation of that object changes (and the view displayed to the user, or so one would hope)…

Or alternatively…

You can try the sexy FP/Immutability approach and add your changes to the News object to an array tracking every historical change so you can then iterate through the array and figure out what the correct state representation should be (phew!).

I am trying to learn what’s right here. Please do enlighten me 🙂

Fashions come and go buddy. There are many ways to skin a cat.

I am sorry that you have to bear the confusion of a constantly changing set of programming paradigms. But hey, WELCOME TO THE CLUB!!

Now a couple of important points to remember with regards to Immutability, and you’ll get these thrown at you with the feverish intensity that only naivety can muster.

1) Immutability is awesome for avoiding race conditions in multi-threaded environments.

Multi-threaded environments (like C++, Java and C#) are guilty of the practice of locking objects when more than one thread wants to change them. This is bad for performance, but better than the alternative of data corruption. And yet not as good as making everything immutable (Lord praise Haskell!).

BUT ALAS! In JavaScript you always operate on a single thread. Even web workers (each runs inside a separate context). So since you can’t have a thread related race condition inside your execution context (all those lovely global variables and closures), the main point in favour of Immutability goes out the window.

(Having said that, there is an advantage to using pure functions in web workers, which is that you’ll have no expectations about fiddling with objects on the main thread.)

2) Immutability can (somehow) avoid race conditions in the state of your app.

And here is the real crux of the matter, most (React) developers will tell you that Immutability and FP can somehow work this magic that allows the state of your application to become predictable.

Of course this doesn’t mean that you can avoid race conditions in the database, to pull that one off you’d have to coordinate all users in all browsers, and for that you’d need a back-end push technology like WebSockets (more on this below) that will broadcast changes to everyone running the app.

Nor does it mean that there is some inherent problem in JavaScript where your application state needs immutability in order to become predictable, any developer that has been coding front-end applications before React would tell you this.

This rather confusing claim simply means that if you use React your application is prone to race conditions, but that immutability allows you to take that pain away. Why? Because React is special.. its been designed first and foremost as a highly optimised rendering library with state management subverted to that aim, and thus component state is managed via an asynchronous chain of events (aka “one-way data binding”) that optimize rendering but you have no control over and rely on you remembering not to mutate state directly

Given this context, its easy to see how the need for immutability has little to do with JavaScript and a lot to do with React: if have a bunch of inter-dependent changes in your spanking new application and no easy way to figure out what your state is currently at, you are going to get confused, and thus it makes perfect sense to use immutability to track every historical change.

3) Race conditions are categorically bad.

Well, they might be if you are using React. But they are rare if you pick up a different framework.

Besides, you normally have far bigger problems to deal with… Problems like dependency hell. Like a bloated code-base. Like your CSS not getting loaded. Like a slow build process or being stuck to a monolithic back-end that makes iterating almost impossible. Like inexperienced devs not understanding whats going on and making a mess of things.

You know. Reality. But hey, who cares about that?

4) Immutability makes use of Reference Types to reduce the performance impact of tracking every state change.

Because seriously, if you are going to copy stuff every time your state changes, you better make sure you are smart about it.

5) Immutability allows you to UNDO stuff.

Because er.. this is the number one feature your project manager is going to ask for, right?

6) Immutable state has lots of cool potential in combination with WebSockets

Last but not least, the accumulation of state deltas makes a pretty compelling case in combination with WebSockets, which allows for an easy consumption of state as a flow of immutable events

Once the penny drops on this concept (state being a flow of events — rather than a crude set of records representing the latest view), the immutable world becomes a magical place to inhabit. A land of event-sourced wonder and possibility that transcends time itself. And when done right this can definitely make real-time apps easier to accomplish, you just broadcast the flow of events to everyone interested so they can build their own representation of the present and write back their own changes into the communal flow.

But at some point you wake up and realise that all that wonder and magic do not come for free. Unlike your eager colleagues, your stakeholders (yea, the people who pay you) care little about philosophy or fashion and a lot about the money they pay to build a product they can sell. And the bottom line is that its harder to code for immutability and easier to break it, plus there is little point having an immutable front-end if you don’t have a back-end to support it. When (and if!) you finally convince your stakeholders that you should publish and consume events via a push techology like WebSockets, you find out what a pain it is to scale in production.


Now for some advice, should you choose to accept it.

A choice to write JavaScript using FP/Immutability is also a choice to make your application code-base larger, more complex and harder to manage. I would strongly argue for limiting this approach to your Redux reducers, unless you know what you are doing… And IF you are going to go ahead and use immutability regardless, then apply immutable state to your whole application stack, and not just the client-side, as you’re missing the real value of it otherwise.

Now, if you are fortunate enough to be able to make choices in your work, then try and use your wisdom (or not) and do what’s right by the person who is paying you. You can base this on your experience, on your gut, or whats going on around you (admittedly if everyone is using React/Redux then there a valid argument that it will be easier to find a resource to continue your work).. Alternatively, you can try either Resume Driven Development or Hype Driven Development approaches. They might be more your sort of thing.

In short, the thing to be said for immutability is that it will make you fashionable with your peers, at least until the next craze comes around, by which point you’ll be glad to move on.


And the reply!

Hello Steven, Yes. I had all these doubts when I considered immutable.js and redux. But, your answer is amazing! It adds lot of value and thanks for addressing every single point that I had doubts on. It’s so much more clear/better now even after working for months on immutable objects. – bozzmob

How to Build a Cross-Platform Metal Detector App

Warning: Use of undefined constant archives - assumed 'archives' (this will throw an Error in a future version of PHP) in /home/desagquj/public_html/wp-content/themes/desalasworks.v1.6/archive.php on line 36

Warning: Use of undefined constant page - assumed 'page' (this will throw an Error in a future version of PHP) in /home/desagquj/public_html/wp-content/themes/desalasworks.v1.6/archive.php on line 36

Warning: A non-numeric value encountered in /home/desagquj/public_html/wp-content/themes/desalasworks.v1.6/archive.php on line 36

Warning: A non-numeric value encountered in /home/desagquj/public_html/wp-content/themes/desalasworks.v1.6/archive.php on line 36
class="post-1798 dw-article type-dw-article status-publish hentry category-code category-mobile category-plugins tag-android tag-cordova tag-iphone tag-javascript">

coin-detector-xplatform-600px

Did you know that your smartphone has an in-built magnetometer to power its compass?

The earth’s magnetic field is big but not particularly strong, and that means that the magnetometer in your phone is sensitive enough to detect small ferrous metal objects such as a coin, a large nail or a piece of cutlery which also generate small magnetic fields of their own. In other words YOU DONT HAVE TO GO AND BUY A METAL DETECTOR, you’ve ALREADY GOT ONE INSIDE YOUR PHONE! We just have to unlock its potential.

Do you want to try a bit of hacking?

In this post, I’m going to show you how you can build your own cross-platform metal detector app for BOTH  iPhone and Android phones, this app will interface with the magnetometer hardware in your phone and notify you of any ferrous metal or magnetic objects nearby.

This should take from 30 mins to 2 hrs of your time for either platform and depending on the speed of your internet connection, perhaps longer if you have bad luck and something doesn’t work straight away.

Introducing Cordova (or PhoneGap, for Adobe fans)

The Apache Cordova project is an open source initiative aimed at bundling a HTML page (ie `index.html` – such as the one below) into a native app that will work across just about every smartphone device. This is great news because it means that with you only need to code your app once and it works on multiple devices!

# index.html

<html>
<head><title>My First App</title></head>
<body>
<button onclick=”alert(‘World’)”>Hello</button>
</body>
</html>

PhoneGap is the same thing, but with a snazzier name trademarked by Adobe (the Photoshop people) and with an online service that gives you a wizard-like interface for building apps so you dont have to deal with obscure command line errors, but then you have to pay Adobe for the favour.

So what does this ‘Cordova’ thingy do for me?

Using Cordova means that you don’t have to know how to setup a mobile app project because its all done for you! Cordova will basically generate all the folders and files you need to get started with a basic HTML ‘Hello World’ app for each platform.

Cordova also has a powerful ‘plugin’ framework that allows access to the phone’s hardware, in this post we will be downloading 2 different plugins to unlock the Magnetometer and Vibration functionality inside your phone.

To get started with a Cordova app you need to install NodeJS (http://nodejs.org) which is a powerful javascript command line tool that Cordova uses to do most of the donkey-work for setting up your project.

The Code

Go have a look at the following ‘index.html‘ file in Github, it contains all the code you need for a basic magnetometer app:

https://github.com/sdesalas/cordova-magnetometer-app/blob/master/www/index.html

Save it to your computer:

1. Right-click on ‘Raw‘ button
2. Choose ‘Save link as..’ on the context menu
3. Put it somewhere sensible where you can find it

Hey, this is HTML right?

Correct, that means your browser can open it.

Double click to open it on a browser. You should get something like this:

Err.. Why?

Well, your mobile has a magnetometer in it your PC doesn’t. So all you’ll get out of it in a desktop browser is a ZERO reading.

And thats ok, it just means everything is working as expected.


The Android App

What You’ll need:

1. A PC or Mac with NodeJS, Java (JDK7) and Android Studio installed.
2. An Android (4.0+) device and USB cable for testing.
3. Basic understanding of a command line interface (you can navigate between folders).

CORPORATE FIREWALLS: Note that the steps below may not work behind a corporate firewall, you may need extra steps to set up internet access via a corporate proxy.

You’ve already installed NodeJS right? If its a old version (older than 0.11) you might want to download the latest and re-install it.

Ok, next you will need Java JDK 7 installed and Android Studio, these are needed to create a native app for Android. You can get them on the following links:

JDK7: http://www.oracle.com/technetwork/java/javase/downloads/jdk7-downloads-1880260.html -> Remember x86=32bit, x64=64bit

Android Studio: https://developer.android.com/sdk/index.html

BEWARE: after installing/running Android Studio, it will want to dowload the latest Android SDKs (the bits of functionality that enable your PC to talk to the phone hardware), this can take anywhere from 10 minutes and up to a couple of hours over a slow internet connection.

Installing Cordova

We are now going to install Cordova and create an Android project.

Open up a command line window and type :

> npm install -g cordova

Creating the Android Project

Next, navigate to your projects folder and create a new cordova project with android support:

> cordova create magnetometer my.magnetometer magnetometer
> cd magnetometer
> cordova platform add android

If all goes well, this should have created a bunch of files and folders (ie a project structure) within your ‘magnetometer’ project folder, you should be able to see them using a file explorer:

Copying our Metal Detector Code

The folder ‘www‘ contains our web code. Here is where we’ll be placing the index.html file that we downloaded before.

Building the App

Go back to the command line and run an extra couple of commands to ‘unlock’ the vibration and magnetometer functionality on your phone.

> cordova plugin add cordova-plugin-vibration
> cordova plugin add cordova-plugin-magnetometer

Next we are going to ‘build’ the app, so you can use it on your android phone. We need one more cordova command to ‘prepare’ the app:

> cordova prepare

Then follow these instructions:

1. Open Android Studio
2. On the Welcome Prompt. Select ‘Import Project’
3. Click on the ‘platforms\android’ folder inside your project.
4. Press ‘OK’.
5. Press ‘OK’ again if you get an extra prompt about Gradle settings.
6. Wait for the progress bar to finish.

This will create an android project, next we will build the APK file that can be used to run the magnetometer app on your phone.

Make sure you’ve waited until all the progress bars are finished before the next steps.

1. Android Studio will need to get all required Java libraries that the project depends on, this usually takes some time. Did you really wait until all progress bars and loading messages were finished?
2. Ok, click on the ‘Play’ button at the top menu as per screen below.
3. This will trigger a build using Gradle. You can see the progress on the ‘Gradle Console’ window.
4. When ready, a popup will appear asking if you want to run the emulator. DO NOT press OK here. It will grind your computer to a halt. Just press ‘Cancel’ on the popup.

Installing the App on your Android Phone

Next we are going to email ourselves the completed app.

1. Navigate to your ‘magnetometer’ project folder using the file explorer.
2. Click ‘platforms’ -> ‘android’ -> ‘build’ -> ‘outputs’ -> ‘apk’
3. Find the file ‘android-debug.apk

4. Next. Email it to yourself.
5. Go to your Android phone.
6. Open ‘Settings’ > ‘Security’
7. Turn ON ‘Unknown Sources’ (you can turn it back OFF later)
8. Open your email, click on the attached ‘APK’ file.
9. You should then get an installation screen as per below.

10. Go to your Apps and look for ‘magnetometer’, then open it.
11. READY! Start finding some metal objects!

The iOS App

What You’ll need:

– A newish Mac with NodeJS and XCode installed
– An Apple Developer membership (US$99)
– An iPhone (4.0+) and USB cable for testing.
– Basic understanding of a command line interface (you can navigate between folders).

Installing Cordova

1. Make sure you have NodeJS installed and its at a reasonably new version (0.12+).
2. If you need to update the version of node. Do it following this article.
3. Open a terminal window (Look for the ‘Terminal’ app in Launchpad)
4. Type the following command to install Cordova :

$ sudo npm install -g cordova

5. You’ll be prompted to enter a password for your user account (on the mac).
6. There will probably be some warnings when installing Cordova (“WARN”), you can safely ignore these. If you get any “ERROR”s they are a bit more of a problem and will need attention before continuing. Type the errors into Google for help.

Creating the iOS Project

Once Cordova has been installed, we are going to create the project structure for our magnetometer project. Firstly, navigate to your projects folder. The commands to use are :

$ cordova create magnetometer my.magnetometer magnetometer
$ cd magnetometer
$ cordova platform add ios
$ cordova plugin add cordova-plugin-vibration
$ cordova plugin add cordova-plugin-magnetometer

Copying our Metal Detector App Code

This should have created your project structure as per following screenshot. Make sure you delete the contents of the ‘www’ folder and replace them with the ‘index.html’ file you downloaded earlier.

You will then need to run the following command on your ‘magnetometer’ folder to ‘prepare’ the files (it will copy the ‘index.html’ to the XCode build folder).

$ cordova prepare

Building the iOS App

And now we can continue to XCode by finding the file ‘magnetometer.xcodeproj’ inside our project folder (look inside the sub-folder ‘platforms’ and ‘ios’). Just double-click on it and it will open (if you have XCode installed).

Make sure you are signed in as an apple developer. Joining costs US$99. You cannot drop an app on your iOS device without one of these:

1. Go to ‘XCode’ (on the top menu)
2. Select ‘Preferences…’, then ‘Accounts’
3. Click the plus (+) sign to add an account
4. Enter your Apple Developer email and password

Running the App on your iPhone

Then just go and run the app! This bit is even simpler than for Android!

1. Connect your iPhone to your Mac using the USB cable.
2. Select your iPhone as the device ‘target’ on the top menu
3. Press the ‘Play’ button to run the build.

And VOILA! Now start finding some metal with your iPhone!

And thats IT!

That concludes my post for today, thanks for taking an interest. I hope you didn’t have to bang your head against the keyboard too much to get this working.

Please feel free to write your comments and experiences below.

If you liked it then you are welcome to shout me a beer or help me out by sharing it with your friends and colleagues.

BYE!!!

Tasmanian Convict Finder

Warning: Use of undefined constant archives - assumed 'archives' (this will throw an Error in a future version of PHP) in /home/desagquj/public_html/wp-content/themes/desalasworks.v1.6/archive.php on line 36

Warning: Use of undefined constant page - assumed 'page' (this will throw an Error in a future version of PHP) in /home/desagquj/public_html/wp-content/themes/desalasworks.v1.6/archive.php on line 36

Warning: A non-numeric value encountered in /home/desagquj/public_html/wp-content/themes/desalasworks.v1.6/archive.php on line 36

Warning: A non-numeric value encountered in /home/desagquj/public_html/wp-content/themes/desalasworks.v1.6/archive.php on line 36
class="post-1746 post type-post status-publish format-standard hentry category-mobile tag-android tag-angular-js tag-cordova tag-css3 tag-html5 tag-iphone tag-javascript tag-node-js">

Browse and search through detailed records of 85,000 convicts transported to Tasmania and those convicted locally through the convict system (1803-1893).

tasmanian-convict-finder

This app uses publicly available data from data.gov.au provided by LINC and the Department of Education in Tasmania, as well as newspaper articles sourced from the National Library of Australia.

It is cross-platform and available in both iPhone and Android version.

google-play-en@2xapple-app-store-icon


Research your Ancestry

The app provides a useful reference for anyone seeking to find out more about the convict history of this beautiful island in Australia, and is a handy pocket guide for people researching their ancestry.

tasmanian-convict-finder.workflow

Initially built as an entry into Govhack 2015, this app was completed though unfortunately not in time to join the prize lists.

TrifleJS

Warning: Use of undefined constant archives - assumed 'archives' (this will throw an Error in a future version of PHP) in /home/desagquj/public_html/wp-content/themes/desalasworks.v1.6/archive.php on line 36

Warning: Use of undefined constant page - assumed 'page' (this will throw an Error in a future version of PHP) in /home/desagquj/public_html/wp-content/themes/desalasworks.v1.6/archive.php on line 36

Warning: A non-numeric value encountered in /home/desagquj/public_html/wp-content/themes/desalasworks.v1.6/archive.php on line 36

Warning: A non-numeric value encountered in /home/desagquj/public_html/wp-content/themes/desalasworks.v1.6/archive.php on line 36
class="post-1739 post type-post status-publish format-standard has-post-thumbnail hentry category-code category-ui tag-c tag-distributed-computing tag-github tag-javascript tag-net-framework tag-test-driven-development">

triflejs-org

Environmental Defenders Office

Warning: Use of undefined constant archives - assumed 'archives' (this will throw an Error in a future version of PHP) in /home/desagquj/public_html/wp-content/themes/desalasworks.v1.6/archive.php on line 36

Warning: Use of undefined constant page - assumed 'page' (this will throw an Error in a future version of PHP) in /home/desagquj/public_html/wp-content/themes/desalasworks.v1.6/archive.php on line 36

Warning: A non-numeric value encountered in /home/desagquj/public_html/wp-content/themes/desalasworks.v1.6/archive.php on line 36

Warning: A non-numeric value encountered in /home/desagquj/public_html/wp-content/themes/desalasworks.v1.6/archive.php on line 36
class="post-1697 post type-post status-publish format-standard has-post-thumbnail hentry category-websites tag-css3 tag-mobile tag-php tag-wordpress">

This project was a custom WordPress Template build for the Tasmanian Environmental Defenders Office.

edo_tas_desktop_screen

The project included responsive support for Tablet and Mobile devices at various resolutions:

edo_tasmania_devices

The website went live in late November 2013, just in time to help the Environmental Defenders Office establish its online presence before the government removed funding for the EDO network.

Desalasworks Ltd registered in England and Wales Number 07267267